
Welp, REAPER 7 is out! 🤯 I honestly never expected it to come so soon but here we are!
Before I dive into the new features, I want to answer one of the most common questions whenever a new version of REAPER comes out:
Is this a free upgrade? 🤔
When you purchase a REAPER license, it will work for the current and next version of REAPER.
For example,
- If you bought a license for REAPER 6, your license will work for REAPER 6 until REAPER 7.99.
- If you bought a license for REAPER 5, your license will work from REAPER 5 until REAPER 6.99. You will have to buy a license for REAPER 7.
I think it’s very fair since these major updates come out pretty much every 4-3 years. Last time I paid $60 for REAPER was 8 years ago and I am fully happy to pay $60 again after so long!
So what’s new?
A bunch of stuff! I am just going to start talking about the major things and some interesting things I keep finding. Feel free to jump into anything you find interesting!
Let’s gooooo 😎
ㅤ
📒 Table of content
3. Track Lanes & Swipe Comping
7. More Track Channel and MIDI I/O
8. Easy switch between keyboard and mouse shortcut sets
9. New backup options in Preferences
10. New folder collapse options in Preferences
1. Fresh new REAPER 7 theme 👕
Right away you will notice that REAPER has a new and fresh look!
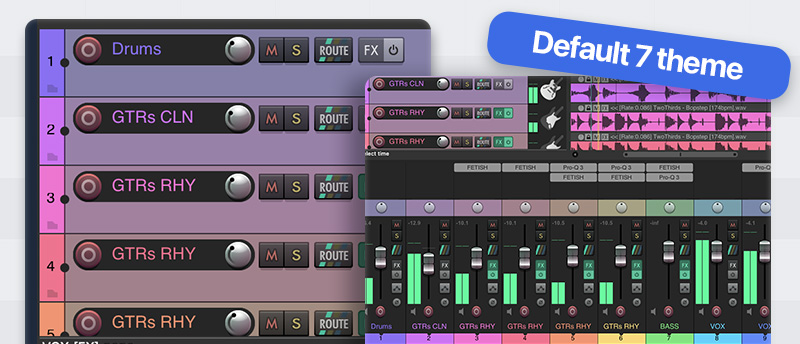
If you are upgrading or using another theme, you can go to Options → Themes and switch to the new default theme to try it out.
The new theme has a more minimal look and includes a few UX improvements such as:
- The mute and solo buttons are now located inside the track, similar to most conventional DAWs.
- The mixer is incredibly responsive and works well in all sizes.
- You can now see FX inserts directly in the Track Control Panel. To enable this feature, right click in an empty field of the TCP and select "Show FX inserts in the TCP".
And what excites me the most about this new theme is the improved theme adjuster, however…
The theme adjuster is not ready yet 🥲
Currently, the theme adjuster for REAPER 7 is still in development and undergoing testing. I am particularly excited about the new possibilities that this feature will bring. With the new theme adjuster, we will have the ability to easily customize the appearance of REAPER like never before!
For now, we just need to be patient. I am confident that it won't be long until it is released.
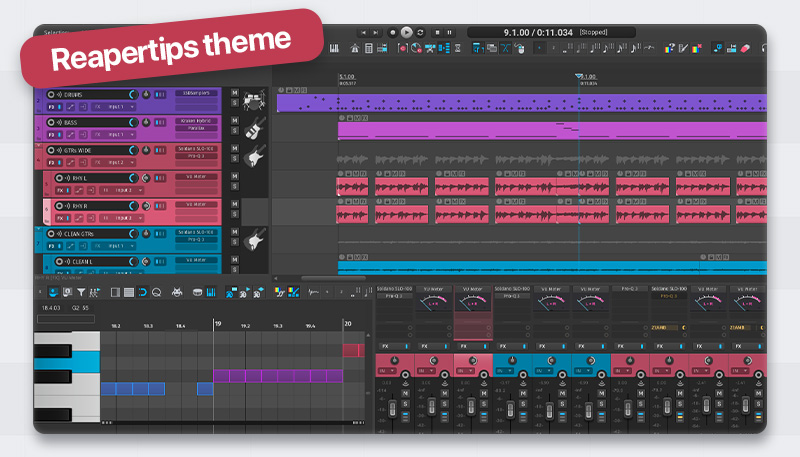
Not happy with the new theme?
No worries, you can still use other themes! Including past default themes like v6 and v5.
I highly recommend checking out the Reapertips Theme, though. I am biased but I think it looks the best! 😉 – which I will be updating so it works with the new theme adjuster in REAPER 7!
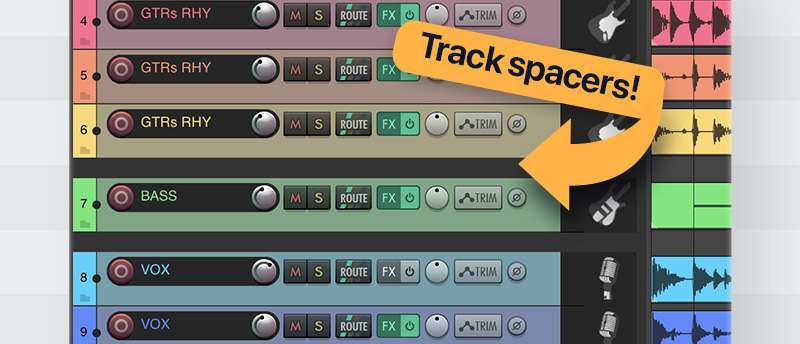
2. Track Spacers 🚀
REAPER introduced a new track type called "Track Spacer" that can be inserted in the Track Control Panel. This track can be used to separate tracks and create a more organized space.
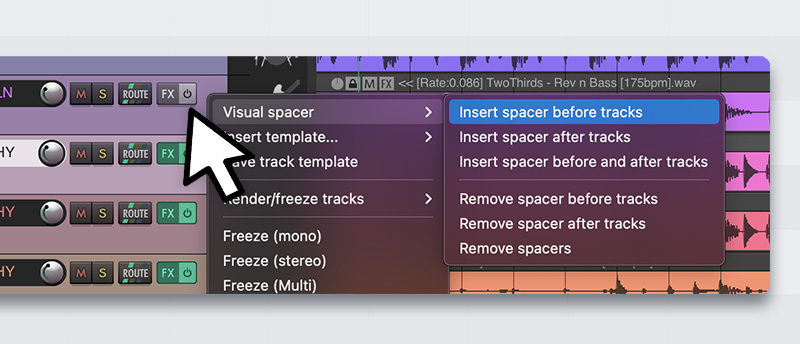
How to insert a Track Spacer
The easiest way to do this is by right-clicking any track and selecting "Visual Track Spacer" and "Insert spacer before tracks" from the dropdown menu.
You can also find these options in the Actions menu. Just search for "Track Spacer" and you will be able to set shortcuts or add them to your toolbar for quick access!
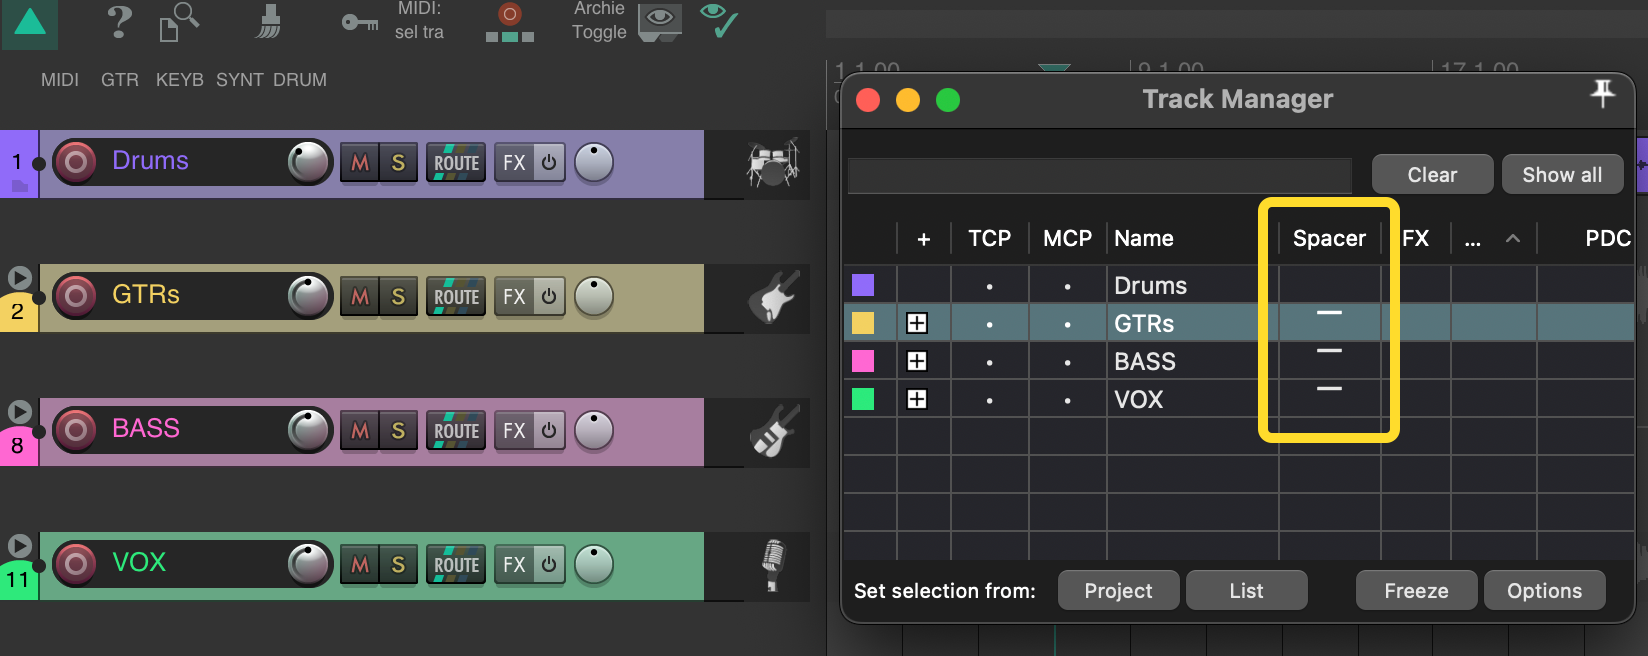
Another easy way to add track spacers is by using the Track Manager (View → Track Manager). In the Track Manager, you will find a column labeled "Spacer". Simply click on it and the spacer will be inserted before the track!
Customizing the Track Spacer
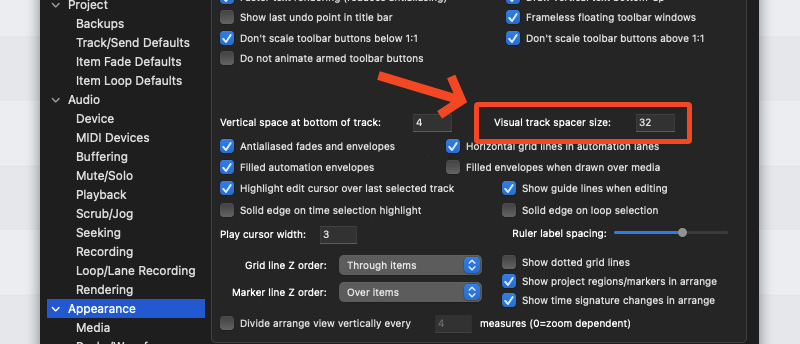
By default, track spacers are set to a height of 16 pixels, but you can change this in the Preferences panel.
To adjust the height, navigate to Options > Preferences > Appearance, and modify the value of the track spacer size to your preferred number. I personally like to set it to 24 pixels!
3. Track Lanes & Swipe Comping 🏎
There is a new track mode called "Track Lanes" in REAPER 7.
You can activate this function by right-clicking a track and selecting "Fixed Item Lanes".
Fixed media item lanes provide additional tools and techniques for building projects. They allow you to record, layer, edit, manage, and comp material. Think of them as tracks within tracks. You can record up to 128 lanes within a single track.
Using track lanes for recording and comping
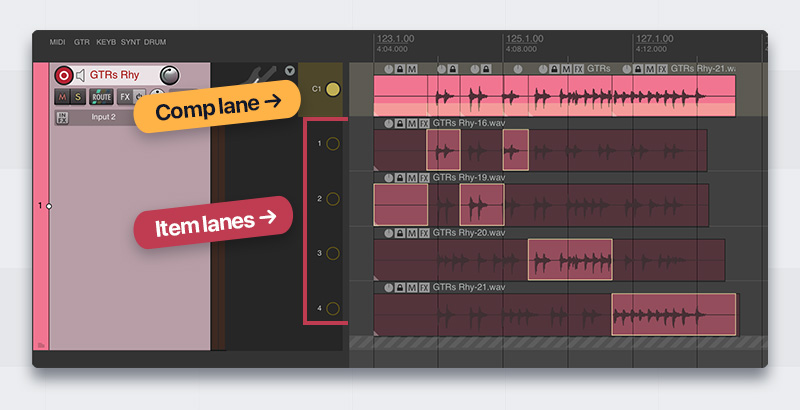
To understand how track lanes and comp swiping work in REAPER 7, let's recreate the image above:
- Add a new track, right-click on it, and set it to "Fixed Item Lanes". The first lane will appear.
- Record into this track once, and repeat the process by overlapping the previous recording. This will create another lane.
- Repeat the process two more times, resulting in four different lanes.
- Use the yellow buttons on the left side to isolate the lane you want to hear.
- To activate comping, right-click one of the yellow buttons and select "Comping > Comp into new empty lane". This will create a lane called "C1" which will be your comping lane.
- Once the C1 lane appears, you will notice it is "armed" with a yellow background. This means you can use swipe comping in the lanes below. If C1 does not have a yellow background, swipe comping won't be available.
Now you can have fun swipe comping! Just click and drag the lanes below and audition what sounds best! 💪
After you finish comping, double-click on the C1 lane to unarm it. The yellow background will disappear, indicating that you can safely edit it further and exit the comping mode.
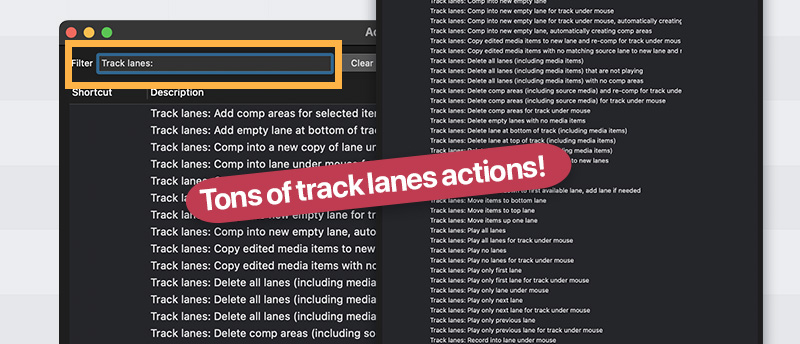
If you go to the Actions menu (shortcut: ?), and search for “Track Lanes:” you will find a bunch of useful actions related to Track Lanes that you can set shortcuts to to speed up your process. If you find yourself using this workflow a lot, I recommend setting shortcuts to the actions you use!
How to convert Takes to Lanes
If you want to convert takes into lanes, it’s super simple!
Just go to the Actions menu (Shortcut: ?) and search for and run the action called “Track properties: Fixed item lanes (convert takes to lanes)”.
If you find yourself using this action frequently, I recommend setting a shortcut for it or placing it in a toolbar!
Using track lanes as a way to save and try different ideas
I believe this is my favorite way to use track lanes. It allows you to save "ideas" in other lanes and experiment with different approaches while writing music or engaging in any creative activity.
For instance, let's say you are programming MIDI drums and you've completed an entire verse. What if you want to explore a different idea for the verse using the same track? Just create or duplicate the lane, and you'll be able to easily switch between the different ideas you've recorded.
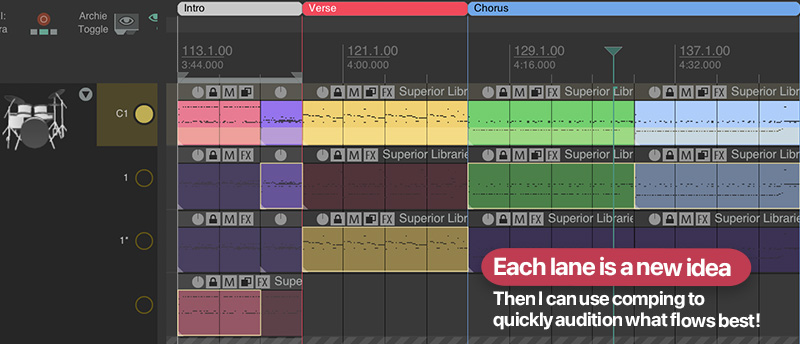
You can even use the comping feature to quickly audition different grooves and select the best one!

ㅤ
TIP: There is a small lane with a striped background at the bottom of all the lanes. You can drag or duplicate items into this lane to quickly create a new lane. I super love this design! 👌

4. Parallel FX Chains ⚖️
Now you can easily set any FX in your track's FX chain to run in parallel instead of serially.
This is super convenient because it means you can now perform parallel processing within the same track without having to create new tracks!
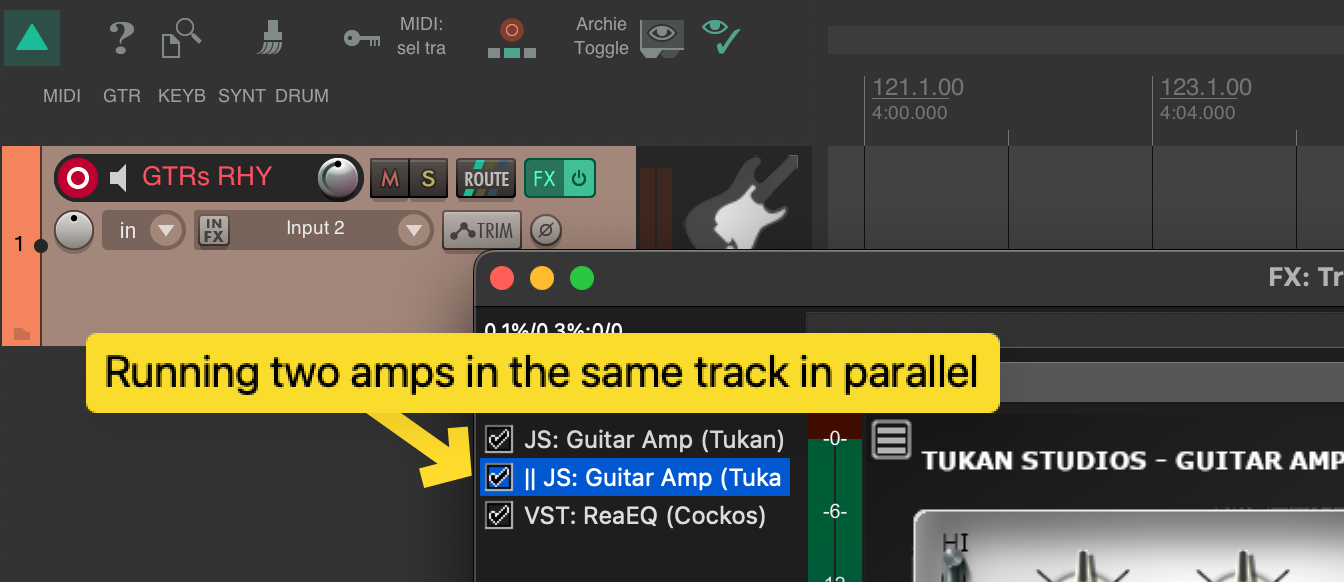
For example, you could run two amps in the same track if one of them runs in parallel like this:
To better understand what is happening in the image above, here is an illustration of how the signal gets divided when it encounters an FX running in parallel, and later gets summed into series:
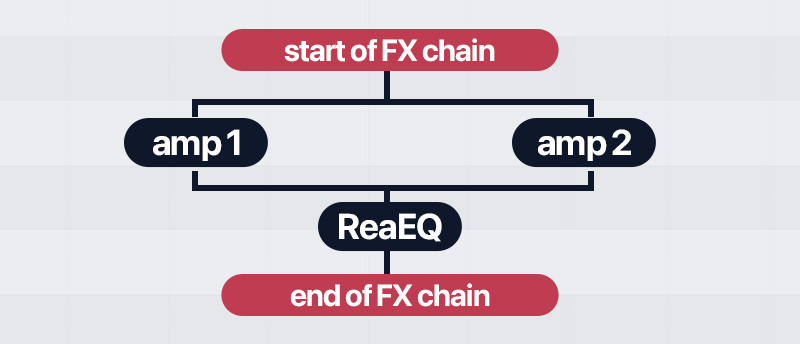
As you can see, the signal passes through Amp 1 and and Amp 2 in parallel before going through ReaEQ.
How do I set an FX to run in parallel?
In your FX chain, right-click the FX you want to run in parallel and select "Run selected FX in parallel with previous FX".
You will see an icon that looks like this → "||" next to the FX, indicating that the FX is running in parallel.
When should I use Parallel FX?
Sometimes, instead of processing effects sequentially, you may want to process them in parallel. This means processing two or more effects (such as EQ and compression) independently of each other. Afterwards, the separately EQ'd and compressed audio is mixed back together. This approach allows you to avoid applying the compressor to the EQ'd signal.
This is quite useful! But what makes it even more powerful is the next significant feature we have, which is FX Containers.
5. FX Containers 📦
This amazing new feature allows you to build, store, and recall self-contained FX chains, including complex routing, configurable parameter mapping and route multiple plug-ins (including FX containers) in parallel.
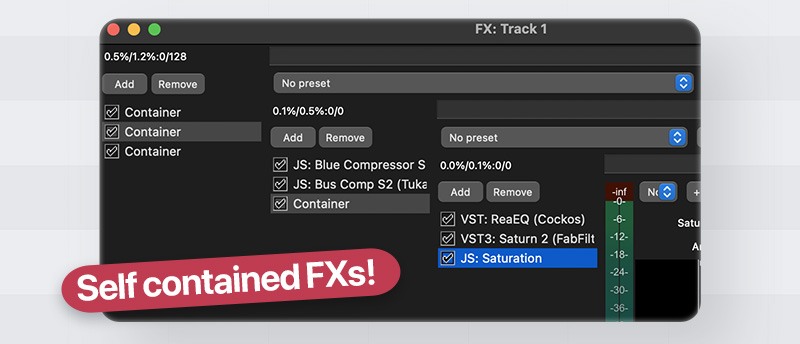
Basically, you can now add a Container to your FX chain. Inside this Container, you can add multiple effects. Think of these effects as being contained within a box within your FX chain.
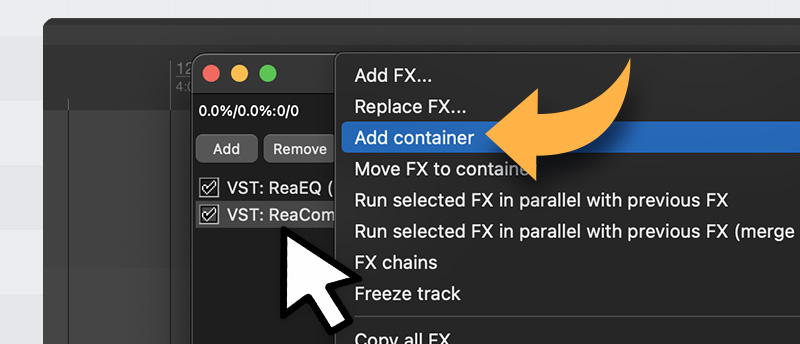
How do I add an FX Container in REAPER?
Easy! – simply right click anywhere in an empty field of the FX chain list and select “add Container”. Or right click one or more effects and you will have the option to add them inside a container.
But what can you do with this FX Container?
Here are some use cases 👇
Convenience
I want to start by highlighting the convenience of having a collection of effects contained in a single box. This allows for easy reordering of effects and enables different results depending on their placement in the chain. Additionally, you can easily copy and paste the effects into other tracks, as well as save and load them as containers for future use.
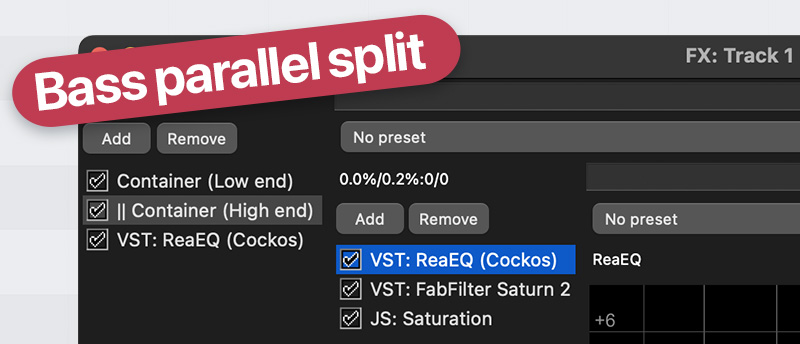
Run the container in parallel.
Just like we learnt before about the parallel processing, you can right click the container and set it to run in parallel.
One example is splitting the bass guitar processing into two parts: using a cleaner signal for the lows and a distorted amped signal for the highs. This is a perfect scenario for using FX containers and parallel processing. By doing this, you can neatly achieve the desired effect on a single track instead of having to split it into two separate tracks.
Blend the container with the original signal
Basically since this container is an effect in your chain, you can blend to taste the result of your container using the dry/wet knob or the final output volume of your effect.
A great use for this is maybe you are doing some parallel distortion with some compressions and EQs, and you want to blend in that signal. You can either use the dry/wet knob of the container located at the top right, OR use the the output knob in the last FX of your container chain.
6. Gain Reduction Metering 💊
Gain reduction metering is now available as an option! This feature allows you to easily see the amount of gain reduction being applied by your dynamic processors to your tracks.

How to enable Gain Reduction Metering in REAPER?
To enable track gain reduction monitoring for plug-ins that measure gain reduction and report it to the host, follow these steps:
- Go to Preferences → Track/Send Defaults and find the Track meter display dropdown.
- Enable the option to “Display gain reduction for plug-ins that support it.”
Please note that the track meter defaults will only be applied to new tracks and will not affect existing tracks in existing projects.
7. More Track Channel and MIDI I/O 🎹
Tracks now support a maximum of 128 channels each. MIDI routing can handle up to 128 buses. Additionally, hardware support allows for up to 128 MIDI input and 128 MIDI output devices. As always, there are no limitations on track counts, sends/receives, FX, ReaScripts, etc.
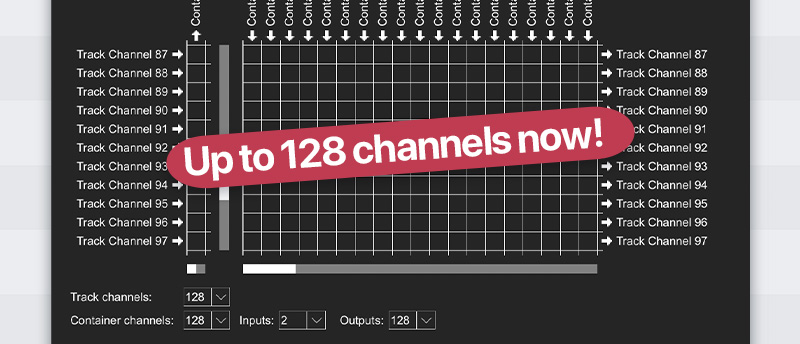
I mean, these are INSANE numbers that open up a whole new world of possibilities for those of you that use virtual instruments and super complex routings!
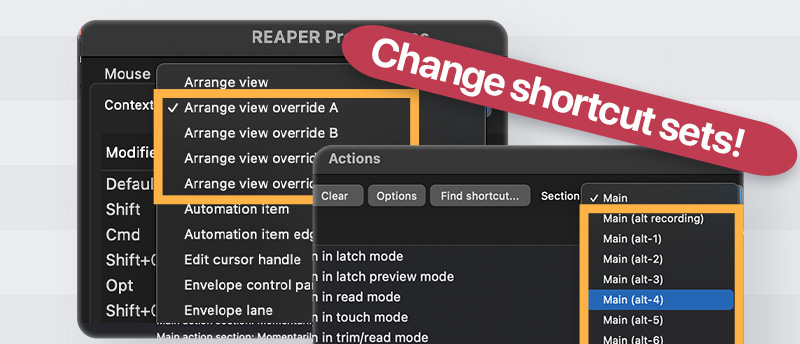
8. Easy switch between keyboard and mouse shortcut sets 🐁
Out of all of the new features, this is the feature that excites me the most!
Finally, you can have multiple sets of shortcuts for different types of workflows, allowing you to easily switch between them depending on the specific workflow you have.
For example, you can have a whole set of unique shortcuts that you use for recording, easily switch to those shortcuts when you are recording and go back to your default shortcuts after you are done recording.
REAPER has so many amazing actions and scripts that I would always run out of shortcut keys to use. And it was always such a difficult choice and lots of compromises had to be made to fit specific workflows. But not anymore! You can easily switch to this new set of shortcuts and go back to your default very easily.
How to change keyboard shortcut sets?
If you go to the Actions menu (shortcut: ?), you will find a list of "Main Alt[number]" options in the Section dropdown. Each of these options provides a blank canvas of shortcuts that you can set. For instance, you can use "Main Alt-2" for your editing shortcuts and "Main Alt-3" for your recording shortcuts.

The best part is that there are actions available to easily switch between your shortcut sets! In the same Actions menu, search for "Main action section:" and you will see the different actions that you can use to switch to a specific action section.
For example, if you want to switch your shortcut set to "Main Alt-3", you would use the action "Main action section: Toggle override to alt-3". I recommend adding this action to your toolbar. Since it's a toggle, you will be able to see when it's activated, and you can press it again to go back to your default shortcuts.
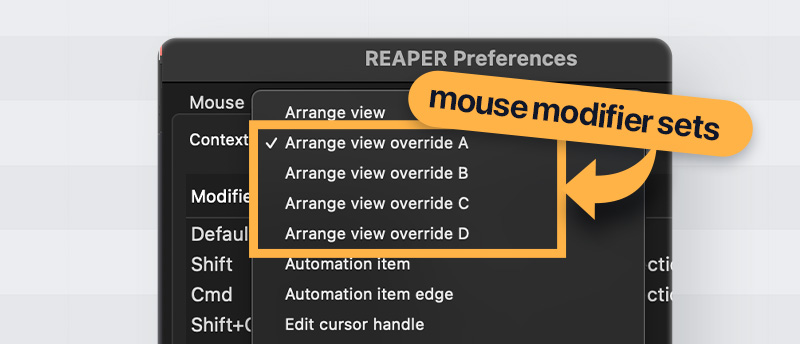
How to change mouse modifier sets?
Similar to changing your keyboard sets, you can now also modify your mouse modifiers for the Arrange view in the same way.
When you navigate to Preferences > Mouse Modifiers, you will find the "Arrange view override A, B, C, D" options in the Context dropdown.
These function exactly like the example I mentioned earlier. You can configure different sets of mouse modifiers for each workflow type and effortlessly toggle between them using the "Mouse modifiers: Toggle arrange view override mouse modifiers" actions.
9. New backup options in Preferences ⛑
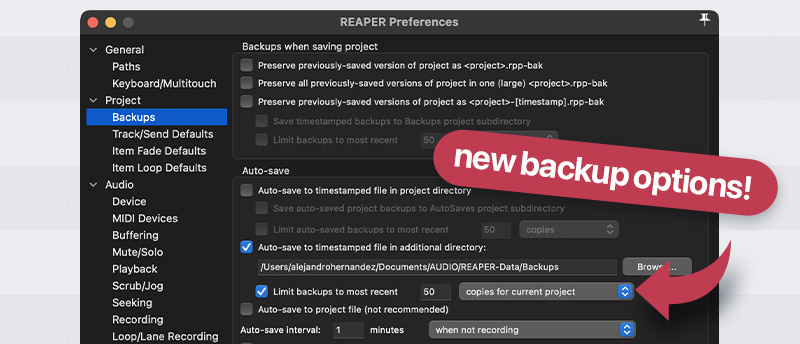
If you haven't set up your backup preferences yet, now is the best time to do it. Seriously, this feature has saved my life countless times. You don't want to lose the precious time and work you put into your projects. There are some additional options that make this even more convenient to use.
I have written a whole article with my recommendations for backing up and organizing files in REAPER. You can check it out here → How to have organized project files in REAPER
One of my favorite new features is the ability to set a limit on the number of copies or days for project backups. This helps prevent clutter on your disk!
10. New folder collapse options in Preferences 🗂
This feature excites me a lot!! I have been asking for it for a long time.
So, you know how when you have a folder and toggle the collapse state, there are usually three states: normal size, medium size, and tiny tracks.
It has always bothered me that there are three states for this. I always wished it was just two states, and I have always wanted to simply show and hide the tracks. Now, it is possible to customize this!
If you go to Preferences > Appearance > Track Control Panel, you can configure it to behave in four different ways!
- Normal, small, collapsed (Default)
- Normal, small, hidden
- Normal, collapsed
- Normal, hidden (My favorite 🤩)
Setting it up as Normal, hidden will make it so you just have to click to show and hide all the child tracks. This creates a very clean look for the project!
I was never a big fan of the tiny tracks in the collapsed state. But if you prefer that, you can keep it. It's just a nice preference to have now 🙂
That’s it… for now!
There’s still a couple of more things I would love to expand on. One thing to keep in mind is that this is only the beginning. I really like how in the reaper.fm website, not only did they show in the feature section all the new features in REAPER 7, they also showed all of the things they added during the development of REAPER 6, and it was a ton!
So that’s the beauty of REAPER development. It’s such an ongoing force of constant updates and surprises. It warms my heart to see it continue improving and improving almost every minute!
I hope this article helped you get a good idea of what’s new in REAPER 7. Leave a comment if there’s any question you have. Thank you for reading!


