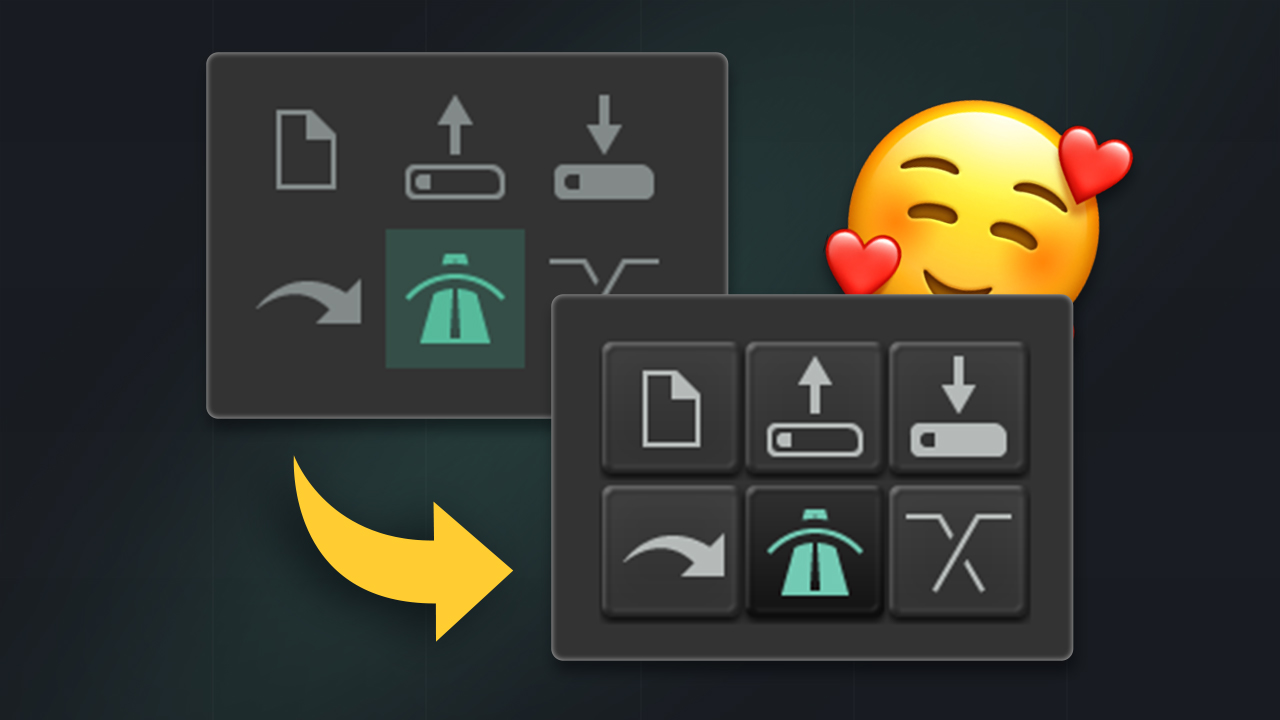
Here are my favorite ways to quickly edit audio in REAPER DAW. It involves using mouse modifier to quickly trigger actions, a custom action that ripple deletes, a script for smart trimming and more!
1. Splitting & deleting
This is my usual way to quickly split and delete items.
To me It just takes less effort and thinking cause you can be like I want to split from here… to here. Then just click on the item you wanna remove while holding cmd and that’s it. I could do this all day and it feels very frictionless.
One thing I forgot to add in the video! 👇
There's a big ergonomic reason behind deleting items by clicking on them with a mouse modifier.I was tired of selecting items and reaching all the way to the right to press the delete key. With this method, I am able to leave my left hand on the left side all the time and just point and click whatever I want to delete. And since it’s a mouse modifier and not a single key shortcut on the left side, it feels as safe as the delete key to me. Less steps and less movements!
Setup
To split the item:
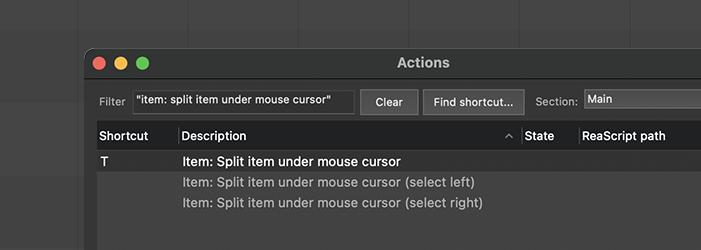
I set a single key shortcut to the action “Split item under mouse cursor”. This way I just position my mouse where I want to split and just hit the key.
To do this, go to Actions menu, and find the action “Split item under mouse cursor” and set a shortcut to it.
To delete the item:
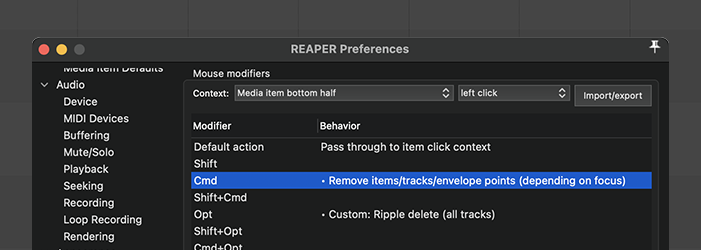
I have a mouse modifier so when I left click the bottom of an item while holding cmd, it will remove the item.
To do this, we go to Preferences > Mouse Modifiers, select Media item bottom half | Left click, and in the line where it says <key>cmd/ctrl<key>, double click and insert the action “Remove items/tracks/envelope points”
💡 Btw, you are free to choose any other key as your mouse modifier! It doesn’t have to be <key>cmd/ctrl<key>, this is what works for me, maybe another key works for your workflow better.
The reason I love deleting items this way is that it just feels way faster than having to select it and pressing the delete key. You can even select multiple items and delete this way!
2. Ripple delete
When I am editing things like dialog or video, I found myself toggling between ripple edit mode and normal mode a lot.
So I wanted to find a way to always stay in normal mode and only activate ripple mode when I need it.
For example,
- If I want to keep the space, I just click while holding <key>ctrl/cmd<key> like I showed you in the previous technique using the mouse modifier.
- But if I want to delete with ripple mode, I have a mouse modifier that will run a custom action that ripple deletes.
Setup
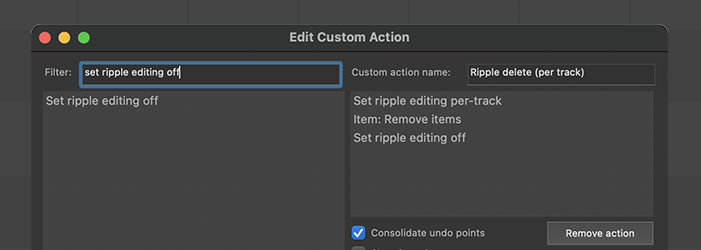
To create the custom action, go to Actions menu, and select New Action… > New Custom Action.
A new window will pop up, in here, search in the left side the following actions and click and drag them to the right side.
Custom: Ripple delete (per track)
• Set ripple editing per-track
• Item: Remove items
• Set ripple editing off
End result should look like this:
Now, to setup the mouse modifier, we do it same way as the previous step.
Go to Preferences > Mouse Modifier > Media item bottom half… double click <key>Alt/Opt<key> and select “Action List…” and select the custom action we created in the previous step.

3. Razor ripple delete
For razor editing, I take the same approach as the two ways I just showed you. I hold <key>ctrl/cmd<key> and click to delete and keep the space. Or hold <key>alt/opt<key> and click to ripple delete.
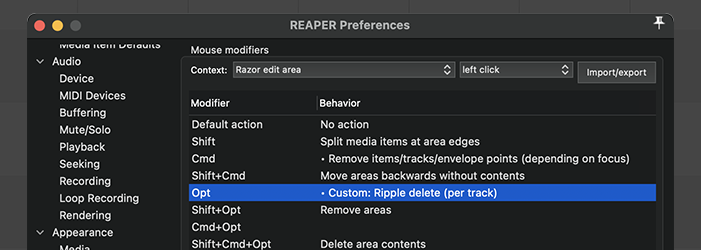
Setup
To set this up, I used the same mouse modifier actions, but this time in different context, which is the razor edit area.
So, for <key>cmd/ctrl<key> it will be set to remove items
And for <key>alt/opt<key> it will be set to the custom action we created in the previous technique.
Mouse modifiers should look like this:
Razor editing is honestly REAPER’s most powerful editing tool.
And I believe what makes it so powerful is really getting used to all the mouse modifiers you have available. With this addition of quick ripple deleting, it’s become my go-to way to bring stuff together all the time.
4. Slip edit
Slip editing is my go-to for things like guitars and drums. And the way I do this is actually all with my mouse and it’s incredibly fast, lemme show you how it works.
Setup
To split the item
We need something that splits and makes a crossfade on the left.
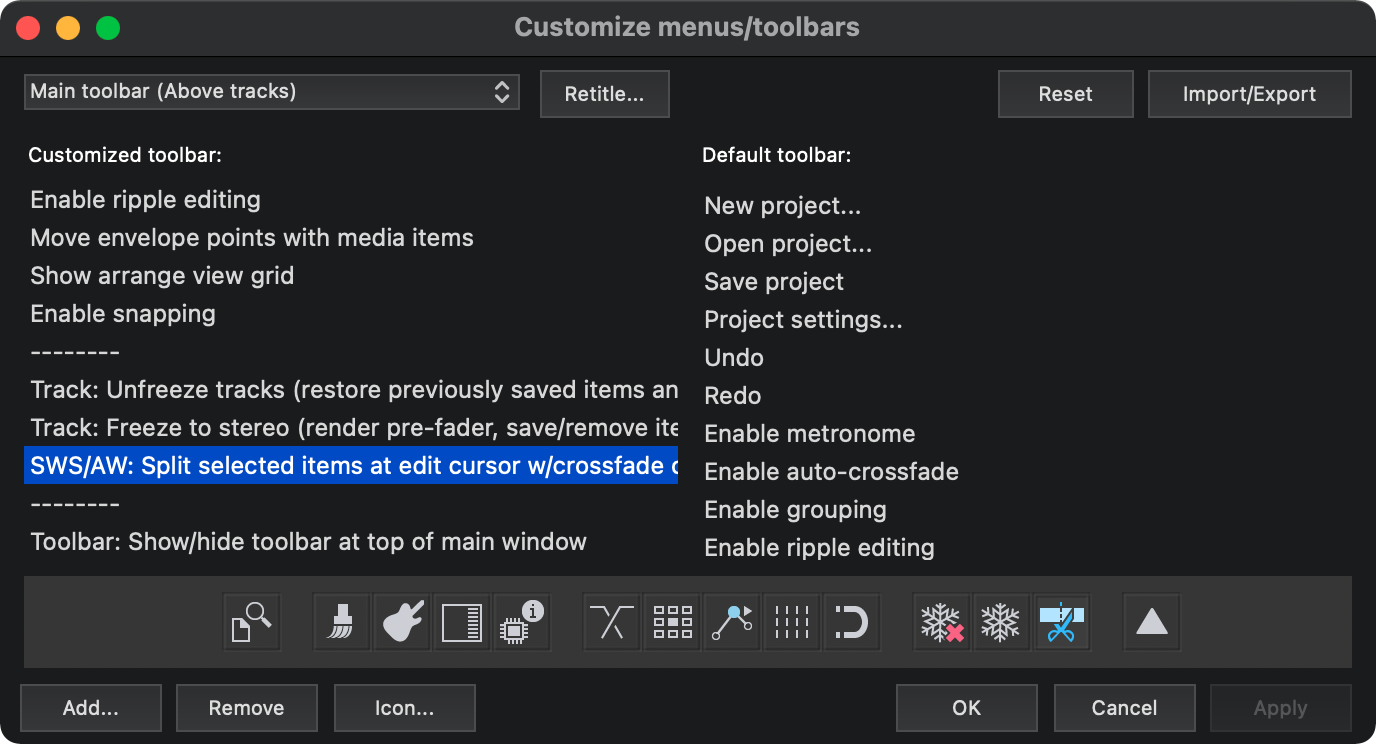
If you have the SWS extension, there’s an action called “SWS/AW: Split selected items at edit cursor w/crossfade on left”. If you place this action on your toolbar, you can right click on it to arm it. Once it’s armed, the action will run every time you click. That means that all of the clicks you make from now on will split and crossfade on the left.

To place an action in your toolbar, right click any of your toolbars and select “customize toolbar” and add the action “SWS/AW: Split selected items at edit cursor w/crossfade on left”.
To move the item’s content
You can do it the conventional by just holding <key>alt/opt<key> and dragging. Which is fine. But for this type of things I like to do it all with my mouse since it’s meant to be done really fast and I feel like having to hold a key adds a bit of friction.
So I setup a mouse modifier to the media item bottom half so when I left drag, the default action will be to move item content. This way I don’t have to hold anything and I just have to drag the bottom half of the item.

So the full workflow looks like this…
If I have to slip edit, I will arm this action on my toolbar by right clicking on it, click to split and drag the bottom half to move the content. That’s it! Once I am done editing, I will right click the toolbar icon to unarm the action.
I can also adjust the crossfade by holding alt while dragging. Or shift + drag to increase the size.
5. Smart Trim
Here’s a set of scripts called Smart Trim. I use these when I want to quickly cut or extend the start or the end of an item. I have these mapped to single key shortcuts like <key>A<key> and <key>D<key>.
What I love about these scripts is that they will either extend or trim the item depending on where I have my mouse cursor positioned. So you can keep hitting the shortcut until you are happy with the cut.
It works well for when you want to maybe expand some of the guitar tail and maybe trim the start to remove some noise.
Setup
These scripts are available via Reapack! If you don’t have Reapack, check out my post about how to install Reapack.
Import Claudiohbsantos repository link:
https://github.com/Claudiohbsantos/Claudiohbsantos-Scripts/raw/master/index.xml
6. Dynamic Split & Remove Silence
I wanted to briefly mention there’s also some amazing automated ways you can split and remove items in REAPER like dynamic split and another action called “remove silence”.
I highly recommend checking out IDDQD’s expansive video on all the things you can do with it!
Reflection
Now, you may wonder what’s the thought process of deciding wether to use razor edit or just the quick split I showed you at the beginning. And I tried to figure this out for a while.
The thing about editing audio is that there’s so many different situations, some solutions will work better than others. Sometimes it makes sense to just do a bunch of razor edits and then split. And sometimes you just wanna split and cut without much thinking.
And I guess my advice would be is do whatever feels most natural at the moment without overthinking it. That’s why I like the first split method as my go-to. Idk how to exactly explain it but it feels way more effortless. It’s just tap tap and click.
And at the end, it’s all about knowing what tools you have available and making them as comfortable and accessible. And with all the customization you can do to REAPER, I am sure it will be easy to create your own workflows.