
Imagine being able to interactively practice your timing using a MIDI instrument. With highly customizable settings and fun visuals, it feels like you're playing Guitar Hero right from REAPER! 🤩
I present to you, the MIDI Rhythm Trainer by Eran Talmor.
Overview
This is a super fun REAPER JS plugin that you can load, define the rhythm pattern, and start practicing your rhythm using any MIDI instrument that you have.
What makes this so fun is that only the accurate notes will be heard, and the visuals will show if you were early (blue note) or late (red note).
By the way, later in this article, I will show you a little hack to use this script with a live instrument, like your electric guitar 😉
🔨 How to install MIDI Rhythm Trainer
To get this JS plugin, you need ReaPack installed. If you don't have it, please follow the steps from this guide I made → How to install ReaPack.
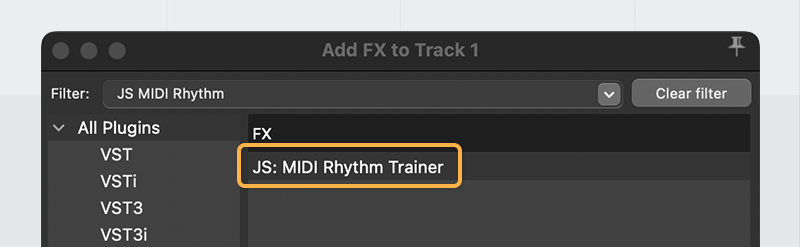
Once you have Reapack installed, this JS Effect should appear in your plugin list. Just search for JS: MIDI Rhythm Trainer.
🎹 How to use MIDI Rhythm Trainer
It’s pretty simple!
- Make a track and load JS: MIDI Rhythm Trainer as the first FX in your chain, then you can load any MIDI instrument afterward to hear what you are playing.
- Record arm your track and enable monitoring so you can hear yourself.
- Turn on REAPER’s metronome, press play and hit your MIDI keys to the beat!

Now I am going to go over some of the fun settings you can find in here.
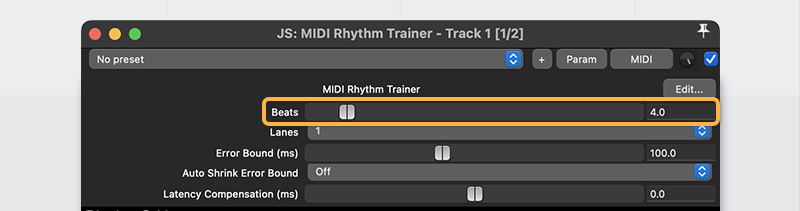
Beats
This is how many beats there are in your display before it turns back around. By default, it’s set to 4 which is a good place to have it. Unless your tempo is really fast I would up it to 8 or 16.
Auto Shrink Error Bound
This is a super fun thing to enable! Basically, as you accurately press the keys, the error bound will keep shrinking, making it harder and harder as you get accurate.
Using the built-in metronome
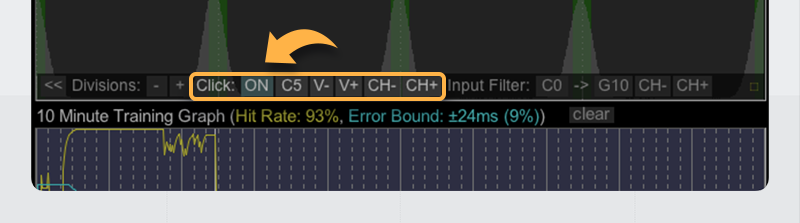
I recommend using the built-in metronome for a more accurate experience. To do so, open the advanced settings by pressing the >> icon at the bottom left of the graph. In here, you will be able to turn on the click.
What this click is doing is just sending a MIDI note that will be played by whatever instrument you loaded. By default, it’s set to C5 but you can click on it and play whatever note you’d prefer as your click sound. And you can use the velocity up/down buttons that are next to it to control the volume of the click.
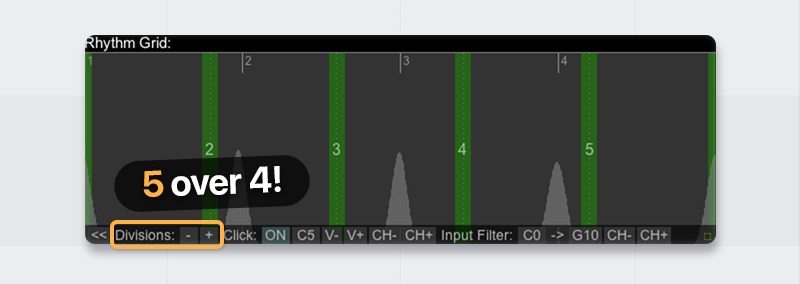
Divisions
In the same advanced menu from before, you can adjust the number of divisions you have in the number of beats you set up. Since it defaults to 4 beats and 8 divisions, you are basically practicing eighth notes. And if you wanted to practice 16th notes, you can set the divisions to 16.
What makes this interesting is that you can use odd numbers and practice interesting polyrhythms with this! For example, set it to 5 or 7 or 9 and enable REAPER’s metronome while also having the built-in metronome enabled, this is super fun!
Swing and phase
Another unique feature of this tool is that you can practice your swing! You can do so by simply clicking and dragging the in-between divisions in the visualizer.
I had never been able to practice this before, so I found this super useful.

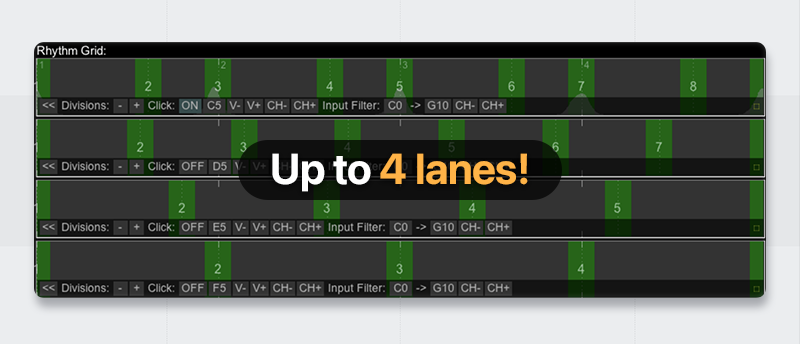
Lanes
This is a bit advanced and kind of a unique but cool use case. You can divide your keys into up to 4 channels.
This is useful if you want to, for example, have different patterns for your left and right hand on your keyboard. You can do so by adjusting the note filter to select where each lane starts.
🎸 Can you use this with live instruments?
Yes! Well, kinda 🤔
I was able to come up with an FX chain where I could use my electric guitar to generate MIDI notes and use those notes with the MIDI Rhythm Trainer.
It’s pretty fun, but it’s a little tricky to make it responsive. And it doesn’t work too well with fast or sustained playing. But it’s pretty good at short staccato playing!
Anyways, here’s how the FX chain goes. I am going to be using my electric guitar for this example.
How to use MIDI Rhythm Trainer with live instruments
- First, add ReaGate. This is what we will use to send MIDI notes whenever you play a note.
- Next, add a MIDI instrument, in my case, I added a piano. This is so you can hear the MIDI that ReaGate is sending and further adjust.
- Go back to ReaGate and select the preset called “stock-snare to MIDI”. This will send a MIDI note every time the gate opens.
- Record arm your track and play your instrument. You should be able to hear your virtual instrument being played every time you play a note with your instrument.

Your FX chain should kinda look like this! - Now you can open ReaGate and adjust the settings until you get a good response from your instrument. In my case, I lowered the threshold until it barely touched the peak, set the filters around 160hz to 7khz, pre-open and attack at 0, and set the hold to about 60ms to avoid duplicate notes.

These settings work well with electric guitar and playing short strong staccato notes! - Once you are happy with the response of your MIDI, you can load JS MIDI Rhythm Trainer after ReaGate and start practicing!
You can bypass the MIDI instrument we were using to audition the MIDI notes. And if you want to hear your guitar, you can raise the dry slider in ReaGate.
That’s it!
Huge thanks to Eran Talmor for creating this! If you want to show your appreciation, report a bug, or ask a question, check out forum thread where he regularly posts updates to this amazing tool.
This is a super fun thing and it kind of makes me wish I had a MIDI guitar because this would be so awesome to practice with that.
ㅤ


