If you ever need to quickly check your waveforms, loudness, or if you're clipping somewhere, try the "dry run" method in REAPER 👌
ㅤ
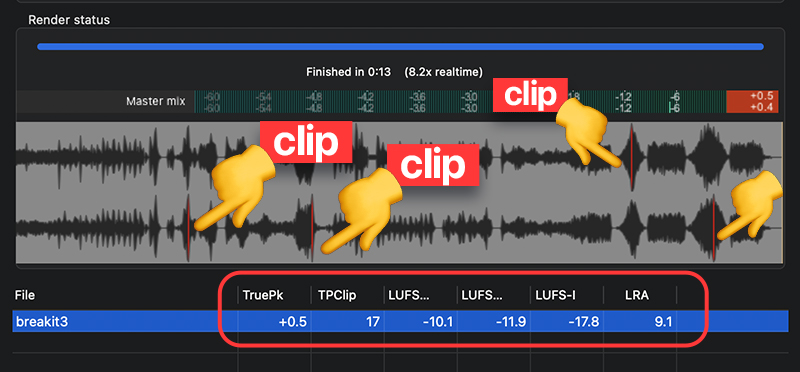
In the Render dialog (shortcut: alt/opt + ctrl/cmd + R), there’s a button at the bottom that says “Dry run”. This will render your project without actually outputting a file, showing you the final waveform as well as other useful info like clipping, loudness levels and stats.
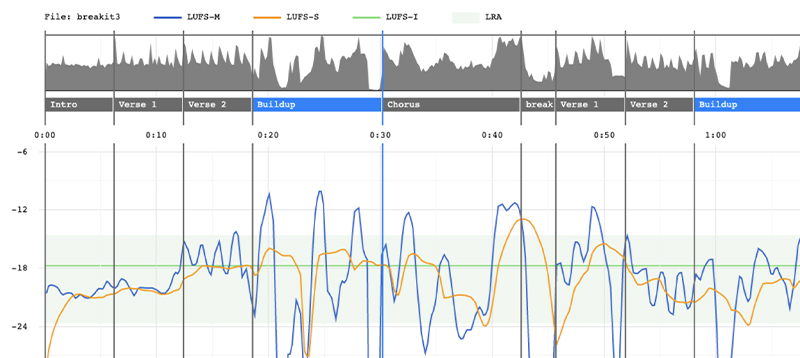
You can get a graph like this with all the readings of your track! It will show the values in a clear and understandable way.
Some uses
- You can quickly check your project's waveforms and loudness levels.
- You can easily see where clipping has occurred.
- You can use the Stats tab to see your loudness stats.
- You can save time by not having to output a file which can take a while.
- You can easily identify any issues with the waveforms before committing to a full render.
About the loudness stats
Once the Dry Run process is finished, you can view the loudness statistics for your project by clicking on Stats/Chart → Open Render Statistics. This includes the integrated LUFS, true peak, and maximum peak levels, as well as the short-term and momentary loudness levels.
This information is useful for ensuring that your track meets the loudness standards of streaming services like Spotify, Apple Music, and YouTube.
These render statistics can be enabled, disabled, and configured in Preferences → Audio → Rendering.
▶Here’s a full list with all terms used and their meanings.
- Peak: dBFS of highest absolute value sample in the rendered file.
- True Peak: estimated dBFS of highest absolute value sample after oversampling 2x or 4x. This is an estimate of what the highest sample value might be if additional processing is done to the rendered file later. True peak calculation is optional because it increases CPU use while rendering, which can increase the time needed to render files.
- Clip: number of samples in the rendered file that are over +0 dBFS. When rendering to a fixed-point file format, clips represent lost audio information and potential digital distortion.
- True Peak Clip: estimated number of samples that might be over +0 dBFS after oversampling 2x or 4x. This is an estimate of how many overs there might be if additional processing is done to the rendered file later.
- RMS: root mean square, a basic measure of total loudness.
- RMS-M: momentary loudness measured over a 400ms window.
- RMS-S: short-term loudness measured over a 3000ms window.
- RMS-I: loudness of the entire rendered file, calculated by measuring momentary RMS frequently, then integrating.
- RMS-RA: dynamic loudness range of the rendered file, calculated by measuring short-term RMS frequently, then excluding the quietest 10% and the loudest 5% of observations.
- LUFS: loudness units full scale, a measure of perceived loudness that adjusts for frequency content.
- LUFS-M: momentary loudness measured over a 400ms window.
- LUFS-S: short-term loudness measured over a 3000ms window.
- LUFS-I: loudness of the entire rendered file, calculated by gating, measuring momentary loudness frequently, then integrating.
- LRA: dynamic loudness range of the rendered file, calculated by gating, measuring short-term loudness frequently, then excluding the quietest 10% and the loudest 5% of observations.
ㅤ
Useful actions
There’s a bunch of useful actions that allow you to dry run render things like your mix, your tracks, time selection and even selected items!
Open the Actions menu (shortcut: ?) and do a search for “dry run”, you’ll find:
- Calculate loudness of master mix via dry run render
- Calculate loudness of master mix within time selection via dry run render
- Calculate loudness of selected items via dry run render
- Calculate loudness of selected items, including take and track FX and settings, via dry run render
- Calculate loudness of selected tracks via dry run render
- Calculate loudness of selected tracks within time selection via dry run render
- Calculate mono loudness of selected tracks via dry run render
- Calculate mono loudness of selected tracks within time selection via dry run render
That’s a lot of actions…
Luckily, Amalgama made a script that unifies all the previous actions into a nice drop down menu like this:
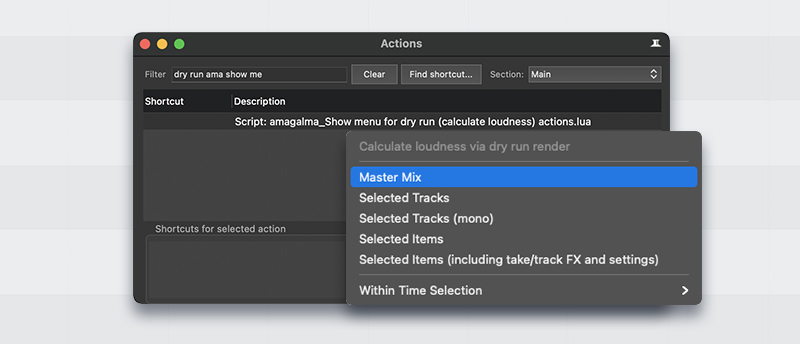
The script name is: Script: amagalma_Show menu for dry run (calculate loudness) actions.lua and you can get it via Reapack.
That’s it!
I am a big fan of using this method to see if I could push my compressors even harder or maybe I need to tone things down. Of course my ears being the first to decide, but the visual aid helps a lot with the decisions 🙂
It's awesome that it tells you exactly when it clipped. Before, there was only a red line in the meters, but now you have a clearer idea of when it happened, making it simpler to manage.
What are some other cool uses you have for it? Let me know 💙
ㅤ