best-reaper-7-themes-2026
how-to-export-audio-in-reaper
theme-replacer-build-your-own-hybrid-reaper-theme
how-to-reduce-latency-in-reaper
should-you-delete-reapeaks-files
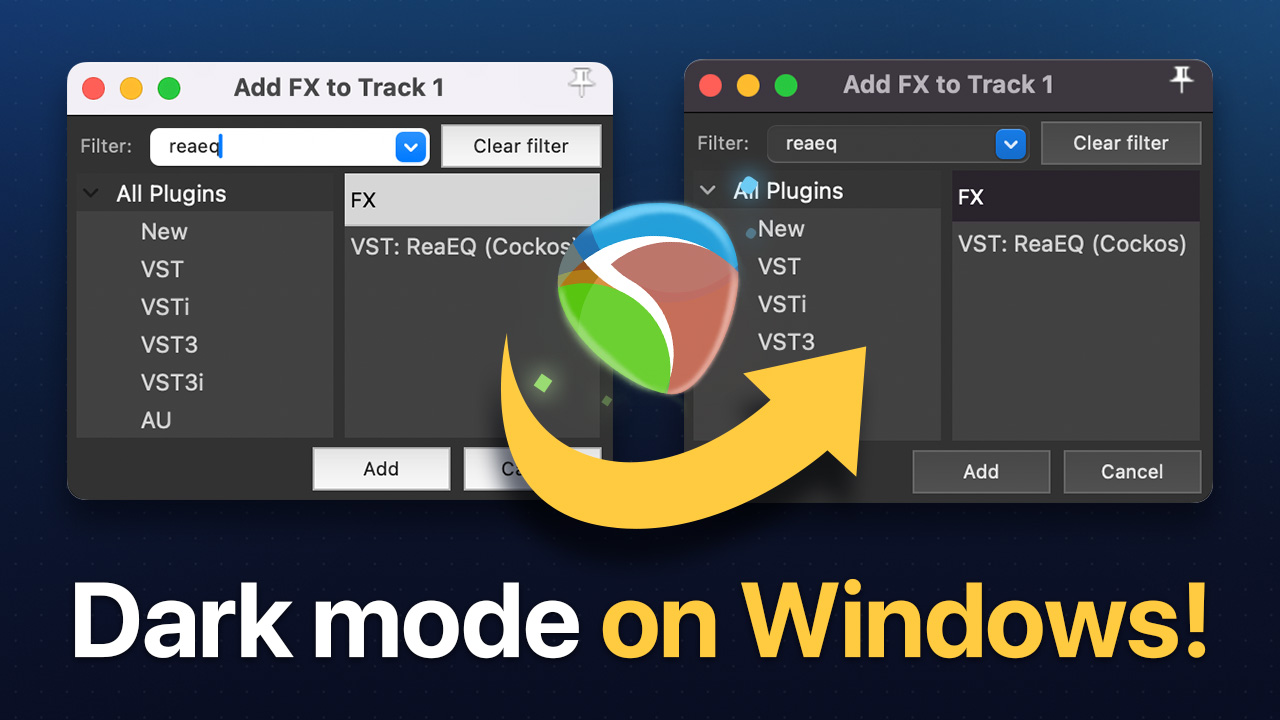
reaper-dark-mode-on-windows
reapertips-theme-complete-guide
what-happened-to-reaper-in-a-year
massive-update-to-regions-and-markers-in-reaper-v7-62-kh9kg
instantly-phase-align-audio-in-reaper
quickest-way-to-add-icons-to-your-tracks
quickest-way-to-color-tracks-items-in-reaper
the-theme-adjuster-for-reaper-7-a-comprehensive-guide
how-to-share-a-reaper-project-with-someone
how-to-convert-drums-to-midi-in-reaper
instantly-convert-audio-to-midi-in-reaper
how-to-export-import-reaper-settings
best-utility-scripts-in-reaper
the-proper-way-to-save-projects-in-reaper-7
how-to-insert-midi-notes-in-one-click-in-reaper
best-midi-settings-for-reaper-s-midi-editor
best-settings-for-reaper-7
practice-your-timing-with-midi-rhythm-trainer-for-reaper
why-reaper-is-not-saving-your-project-settings
how-to-stop-reaper-from-looping-items
split-midi-items-using-mouse-wheel-in-reaper
mind-blowing-midi-note-generator-in-reaper-midi-ex-machina
advanced-fx-browsing-in-reaper
global-scale-tool-in-reaper-let-it-key
5-useful-scale-tools-in-reaper
4-ways-to-get-minimal-in-reaper
how-to-recreate-a-guitar-noise-gate-plugin-in-reaper
best-free-plugins-for-reaper-tukan-studios
how-to-separate-tracks-in-the-mixer
how-to-tweak-any-reaper-theme
js-lava-reverb-amazing-free-shimmer-reverb
how-i-record-guitars-quick-and-easy-in-reaper
5-tips-for-getting-started-in-reaper
create-save-and-load-layouts-in-reaper
customize-the-look-of-your-midi-notes-in-reaper
copy-and-replace-midi-note-sections-in-reaper
quick-way-to-go-through-takes-in-reaper
pan-tracks-using-track-name
amazing-free-denoiser-in-reaper
easy-seamless-loop-using-second-pass-render-in-reaper
reverse-midi-trick-in-reaper
a-guide-to-automation-items-in-reaper
a-trick-to-expand-and-collapse-toolbars-in-reaper
10-automation-shortcuts-in-reaper
how-to-auto-color-in-reaper
quick-way-to-check-your-levels
select-item-without-cursor-moving
how-to-stack-regions-in-reaper
5-ways-to-display-audio-in-reaper
how-to-export-backup-reaper
how-to-merge-midi-in-reaper
layer-sounds-in-one-track-in-reaper
easy-way-to-navigate-big-projects
how-to-install-multiple-reapers
10-tips-for-writing-midi-drums-in-reaper
how-to-add-borders-to-toolbar-icons-in-reaper-6
easiest-way-to-update-reaper
show-fx-list-inside-tracks-in-reaper
smoother-waveforms-and-meters-in-reaper
how-to-copy-and-paste-velocities-in-reaper-b
quickly-test-different-tempos-in-reaper
allow-drag-import-to-insert-new-tracks
duplicate-tracks-with-no-items
how-to-add-gradients-in-reaper
reaper-v6-72-tons-of-new-track-group-features
how-to-clean-your-fx-list-in-reaper-8
retrospective-midi-recording
6-ways-to-lower-cpu-load-in-reaper
6-metronome-tips-in-reaper
a-trick-to-quickly-loop-items-in-reaper
how-to-reorder-midi-notes-in-reaper
how-to-fully-collapse-folders
easy-audio-stutter-in-reaper
easy-clean-up-project-folders
open-project-folder-in-one-click
change-grid-size-with-your-mouse-wheel
quickest-way-to-pan-tracks
how-to-set-midi-velocity-shortcuts
create-shortcuts-to-your-plugins
5-advanced-ways-to-edit-in-reaper
how-to-show-plugin-ui-inside-your-tracks
how-to-show-vu-meters-on-tracks
6-things-i-wish-i-knew-when-i-started-using-reaper
how-to-stretch-midi-notes
how-to-duplicate-tracks-without-items
a-tool-for-customizing-reaper-6-theme